Security
Your security is our top priority at Rentals United. In the Security panel, you can control the security settings of your account. The settings here affect the account owner and the subusers. Enhance your account security and learn about several key features within your account settings. Read the details below.
The Security tab is not available for subusers. If you cannot see the Security tab in the main menu, it means you are not the account owner. If you believe this is incorrect, contact
Changing most of the settings on the Security tab requires you to provide your credentials. It is a mandatory step to confirm your identity before the settings are changed.
Require Multi-Factor Authentication (MFA)
Require Multi-Factor Authentication (MFA) - Multi-Factor Authentication (MFA) is an authentication method where a user is granted access only after successfully confirming the log-in attempt. You can read more about MFA here.
-
MFA is enabled for all users by default (account owner and subusers)
-
MFA can be turned off only for the account owner (not recommended)
-
Subusers are always required to log in using MFA
-
MFA is always required when logging in from an unknown IP address (not in use for more than 2 weeks)
-
MFA notifications are sent to the username in the first place (email address that you use for logging in)
-
You can set up an MFA notifications email where you will receive your MFA notifications (applicable for account owners only). This email will be used for the MFA purposes only.
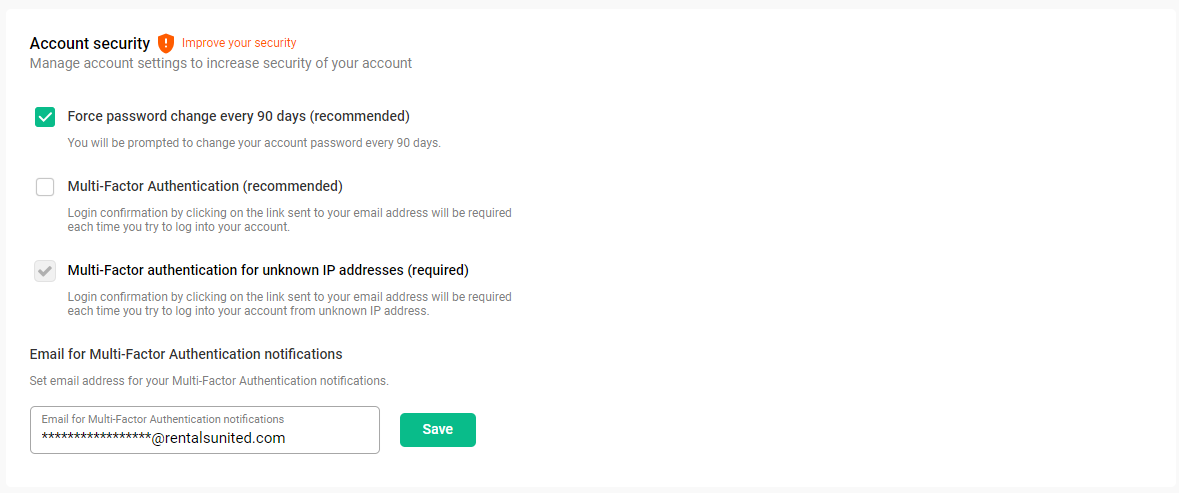
Force password change every 90 days
Force password change every 90 days - this option forces your users and subusers to change the password every 90 days. It is turned on by default. You can read more about the password change requirements and procedures here.
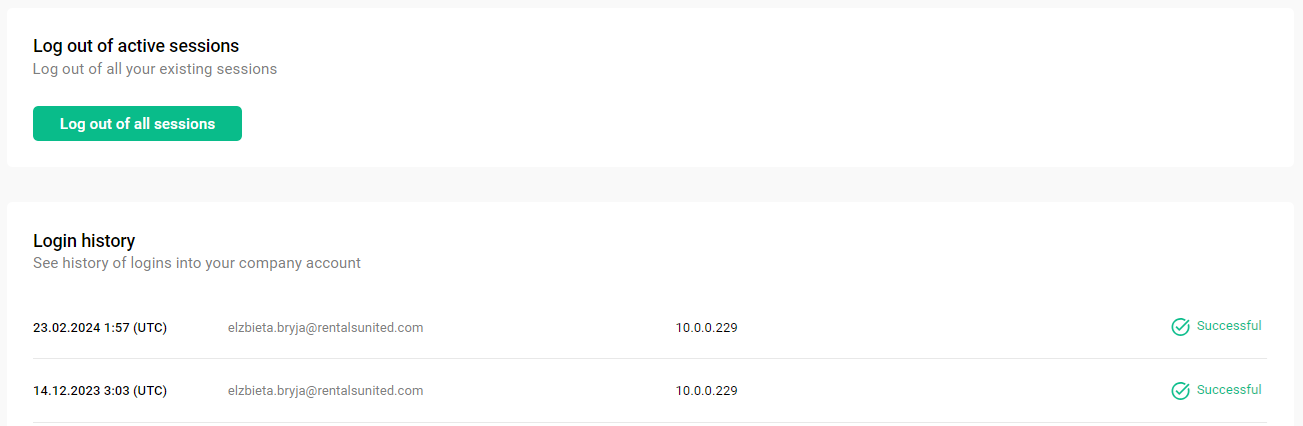
Login history
Log out of all sessions - if you spot any suspicious login attempt or activity in your account, you can force log out and terminate all active sessions (for all users and sessions, including API) by clicking the Log out of all sessions button. You will be logged out from your current session, too. Make sure to change your password afterwards!
Login history allows you to view the recent activity related to the security in your account.
-
login attempt status (successful or failed)
-
login attempt time stamp
-
username used for login
-
IP
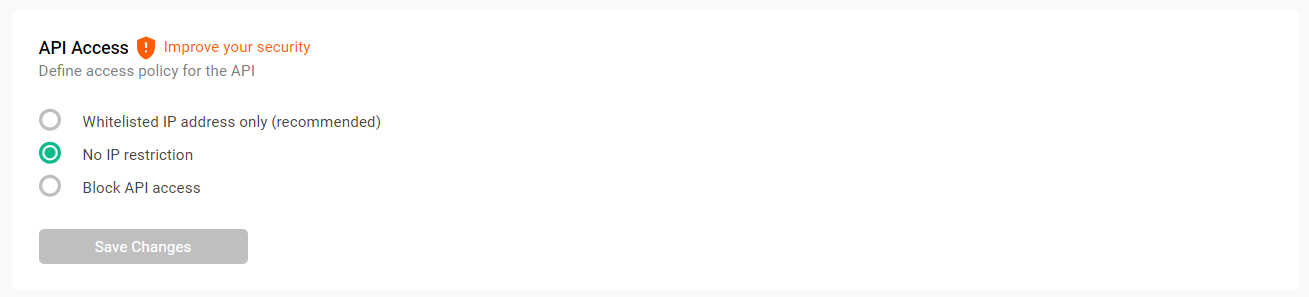
API access
In this section, you can control who can access your account via API. You can do this by defining the IP addresses that would have access to it.
Limiting the API access brings the following benefits:
-
Increases the overall security of your account
-
Protects your data and the data of your customers
-
Secures your account from an unauthorised use
-
Complies with security standards and policies
Request API access
If you do not have API access enabled, you will see relevant information in the Security panel.
By default, all new accounts are created without the API access enabled. However, you can request API access any time.
-
Open the Security panel.
-
Scroll down to the API access section.
-
Click Request access.

The access request is sent to the Support Team and will be soon confirmed. Once it is confirmed, you will see the API access will set to No IP restriction. The Support Team will get back to you.
API access options
Once you are granted the API access, you will see the following options available in the Security panel.
-
Whitelisted IP address only
This option allows you to provide an IP address that can be used to access the API. You can define one or more IP addresses here. The IP addresses used to call our API will be validated against this white list. If a request to our API is made from an IP address which is not added to the white list, the API returns an error message and the request is not processed. Note that you need to define an exact IP address and no masked or wild IP addresses are accepted (recommended & safest option).
-
No IP restriction
This option allows to access your account via API from any IP address. We will not check the IP address from which the request was made (not recommended).
-
Block API access
This option revokes the API access from your account. You will still be able to request API access in future and your request will need to be approved by our Support Team - as described here.
API Keys
API keys provide an alternative way to authenticate when using our API. Instead of relying on personal login credentials, such as a username and password, an API key acts as a digital token that grants access to specific resources or services. Using API keys helps keep personal credentials safe while enabling more controlled and manageable access. Best practices, such as regularly rotating or revoking keys, ensure the highest level of security and reduce the risk of exposing sensitive data.
Having multiple API keys makes it easier and safer to manage access to the API. This way, if one key is lost or needs to be turned off, it minimises the impact on the rest of your set-up. For example, you can:
-
Use different keys for testing and production use
-
Assign separate keys to different team members or tools
-
Track usage to see who is accessing the API
-
Deactivate keys in case they were compromised
Read more about best practice in using the API keys.
Add new API key
Important notes
-
You can create up to 10 API keys
-
API keys are automatically generated by the system
-
API keys section is visible only to users with the API access
-
Create API keys for all products that you use
Create new API key
-
Click + New API Key.

-
Provide the name for your API access key and select the scope. Click Create.

-
The system generates for you the API access key and secret key.

-
The secret key can be revealed only once. Save it and store it in a safe location. If you do not save it now, you will not be able to recover it in the future.
You have two options to access the secret key:
-
Reveal the secret key. Click Reveal. Provide your account password and Confirm. The secret key gets revealed and you can copy it.

-
Download the secret key in a CSV file. Click Download CSV.
-
-
Confirm that you have saved the secret key by checking the box. Click Close.
Your new API Key is now active and will now appear in the list of API keys. You can use it to authenticate your requests to the selected API. See the authentication request structure below.
<Authentication>
        <AccessKey>{accessKey}</AccessKey>
        <SecretKey>{secretKey}</SecretKey>
 </Authentication>
Remove API key
If you want to remove the API key at any point, simply click the three dot menu next to the API key you want to remove and click Delete API key. Note that your account password is needed to confirm this action. This will invalidate all future requests to the API using this API key and secret key combination.

Migrate to the API key authentication
To make your connection more secure, we recommend migrating to API key authentication. This one-time procedure not only reduces the risk of unauthorised access, disabling the use of your account credentials for API requests, but also strengthens overall security by using dedicated, revocable keys for authentication.
Before you start
-
Make sure you have created API keys for all products that you use before you migrate. It is required that you created at least one API key and secret.
-
Make sure your API connection is configured to use API key authentication. See the authentication request structure below:
Copy<Authentication>
<AccessKey>{accessKey}</AccessKey>
<SecretKey>{secretKey}</SecretKey>
</Authentication>
How to migrate
-
Generate your first API key and secret - see Add new API key.
-
You will see a notification about a possibility of migration. Click Migrate.

-
Check the box to confirm that your API connection has been configured to use API key authentication. Click Migrate.

-
A notification is displayed that the migration was successful. Click I understand.
Once the migration is complete, you will see a notification that the account is now secured. Also, you can view API keys use details, such as when keys were created and the last time they were used.
