Connecting to Rentals United
In order to connect your PMS and Rentals United account, follow the below steps. If you have doubts about the process, contact your Rentals United representative to guide you through the process.
Connecting to Rentals United
In order to connect HomeAway using HomeAway 4.2, we expect that you maintain a copy of your HomeAway 4.2 endpoints dedicated specifically for Rentals United. Hence, if you provide any sales channel working on the HomeAway standard with an endpoint, you need to create a copy of this endpoint for Rentals United. For example, an endpoint containing Advertiser Content Index should have a copy meant specifically for Rentals United.
-
For Vrbo: https://yourdomain.com/homeaway/advertisers
-
For Rentals United: https://yourdomain.com/rentalsunited/advertisers
The above should apply to all content you provide the sales channel working on the HomeAway standard, for example Listing Index, Listing Content, Lodging Configuration Index, Lodging Configuration Content, etc. The same applies to your booking endpoints.
Creating the endpoint copies allows for an additional flexibility and integration stability. In such a case, it is possible for Rentals United to extend the HomeAway 4.2 freely. At the same time, you will also be able to update your connection with the sales channel working on the HomeAway standard without affecting your connection with Rentals United.
Once the connection is set up, Rentals United will retrieve your property data (descriptive content, prices, availability etc.) in line with a given version of the HomeAway 4.2 specification.
Connecting to HomeAway 4.2
-
Log into your Rentals United account.
-
Hover over Your profile in the main menu and select PMS Settings
-
In the Choose a PMS field, select HomeAway 4.2.
-
Provide the required information.
-
Service username, Service password - if needed for the URL authentication
-
Advertiser Content Index URL - an endpoint to pull all the data from (it contains Listing Index, Availability Index etc.)
-
Fast Availability URL - an endpoint to use the availability quote
-
Booking Request - an endpoint to push bookings
-
Advertiser Key - a user ID in HomeAway 4.2

-
-
Click the Import all my properties button. All properties that fulfil Rentals United requirements to connect will be now imported from PMS into your Rentals United account.
Minimum requirements to connect to Rentals United
-
Property name needs to be provided.
-
Geo-coordinates need to be provided.
-
Standard number of guests needs to be provided.
-
Maximum number of guests needs to be provided.
-
Property type needs to be provided.
-
Normal check-in and check-out times: need to be provided.
-
Check-in place: If not set, it is automatically set to At the property.
-
Arrival information: If not set, the Landlord's name and Email address are taken from My profile and/or Company profile.
-
HomeAway 4.2 uses Online Booking (OLB) integration to calculate prices. HomeAway 4.2 requires OLB 1.3.
PMS Settings
PMS Settings page is visible fo you only if you are a PMS user. It gives you a possibility to adjust the integration scope with your PMS. Thanks to the custom settings in PMS Settings, you can choose which data gets synchronised to Rentals United from your HomeAway. Note, that these settings are on the account level and will affect all your properties.
You need to log in to your Rentals United account, click on User profile and select PMS Settings from the list.
Scroll down to the checkbox-list. The list references all areas that are available to import the data from.
-
Ticked checkbox
 means that this part of data is being synchronised from HomeAway. If you introduce any changes to this data directly in Rentals United it will be overwritten by the data from HomeAway.
 -
Unticked active checkbox
 means that this part of data is possible to synchronise, but currently it is not. In this case, you can manually add or change data in Rentals United.
 -
Greyed-out ticked checkbox
 means that this part is obligatorily synchronised from HomeAway and you cannot stop this synchronisation.
 -
Greyed-out unticked checbox
 means that this part is not received from HomeAway at all and you need to manually fill this information in the Edit property page accessed from the Properties tab.
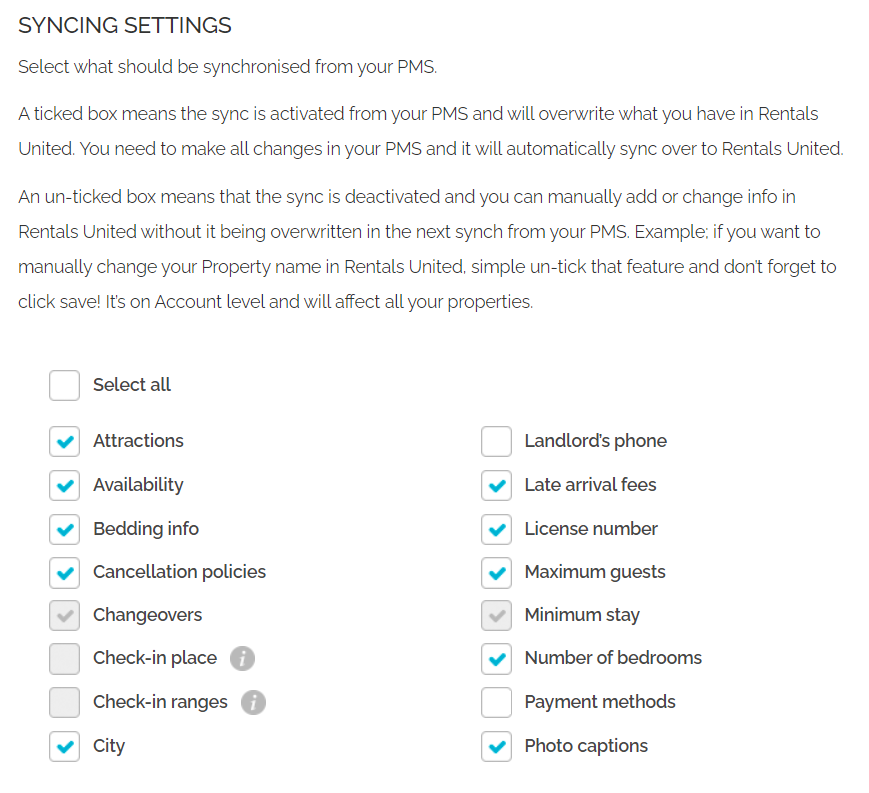
If you want to know what data is exactly synchronised to Rentals United by each checkbox, see here.
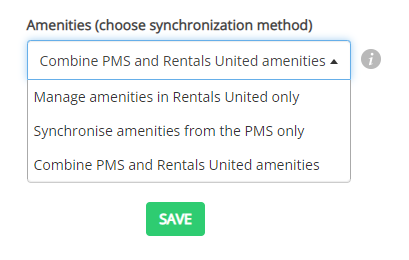
You may noticed that the checbox list does not provide possibility to synchronise amenities. In order to adjust the amenities sync, you need to scroll down to the next section. You have three options available in the dropdown list:
-
Manage amenities in Rentals United only means that Rentals United will never import amenities you have in HomeAway. You will need to manually introduce each amenity for each property to Rentals United. If you decided to select this option, you can avoid repetitive tasks and make this process a little more effective by updating amenities for multiple properties at once. For more information, please see All properties.
-
Synchronise amenities from the PMS only means that only amenities from your PMS are synchronised. In case there ever occurs a need to add or change any amenity, you will have to go directly to HomeAway and introduce changes there. These changes must be done in accordance with the amenity mappings done for this integration. For more information, please see the Step 2: Amenities chapter. Note that in case of PUSH PMS integrations, Rentals United may not be able to provide you with the full list of mapped amenities and you need to contact HomeAway directly.
-
Combine Rentals United and PMS amenities means that Rentals United enables the import of amenities from your PMS, as well as gives you a possibility to add new amenities directly in Rentals United platform. If you select this option and the synchronisation is finished, go to the Properties tab, select the property you want to view and click Edit / Improve.
If you change the synchronisation of amenities from Manage amenities from the PMS only to Manage amenities in Rentals United, all amenities that have been previously synchronised from your HomeAway will not be automatically removed.
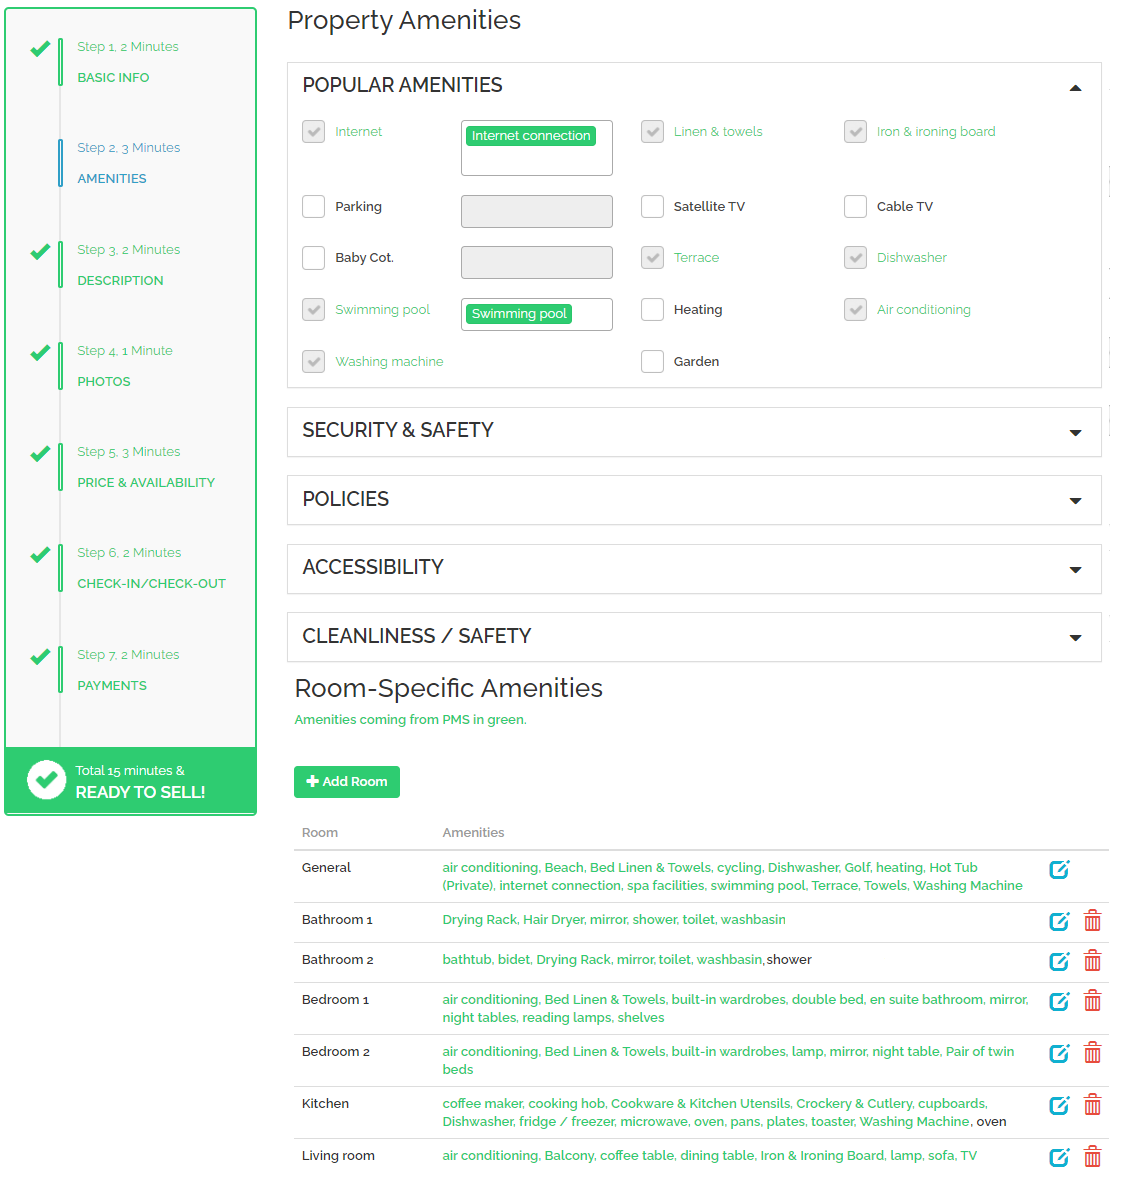
Go to Step 2: Amenities. In this section, the amenities that are pulled from HomeAway will be marked in green and cannot be edited or removed. You can add additional amenities on the property level by selecting them from the list. And, you can even add custom amenities on the room level under Room Specific Amenities by clicking the Edit button and typing them into the field next to the name of the room. The extra amenities that you add in Rentals United will show in black.
After any changes to PMS Settings, do not forget to click the Save / Synchronize button on the bottom of the page in order for the changes to take effect!
You can also check out the video below and see the above live.