Messaging automation
Messaging automation is a crucial feature in guest communication. It allows you to save time and resources by automating the messaging process, enhancing customer engagement and satisfaction. It significantly minimises the risk of providing the guest with wrong information or no information at all.
Use messaging automation in a practical way and save time - share details that apply to all your properties in a single automated message e.g. a welcome / goodbye messages, host emergency numbers or invoicing instructions.
This feature enables you to:
-
set up customised templates for messages
-
choose the bookings for which you wish to automate messages (per sales channel, per property)
-
choose when the messages will be sent (upon booking, before the arrival, during the stay or after the check-out)
Automated messages will show up in the Guest Communication chats in Big Card and Unified inbox.
In this article, you will see how to switch messaging automations on, set up message templates and select the sending day. You can also check this short video tutorial to grasp the basics of the configuration.
Template messages and variables
Template messages are the messages that are created by the property manager and are automatically sent out upon the scheduled day. You can define as many message templates as you want, however we recommend to use this feature moderately in order not to spam your guests. Template messages consist of:
-
fixed text
-
variables
-
attachments
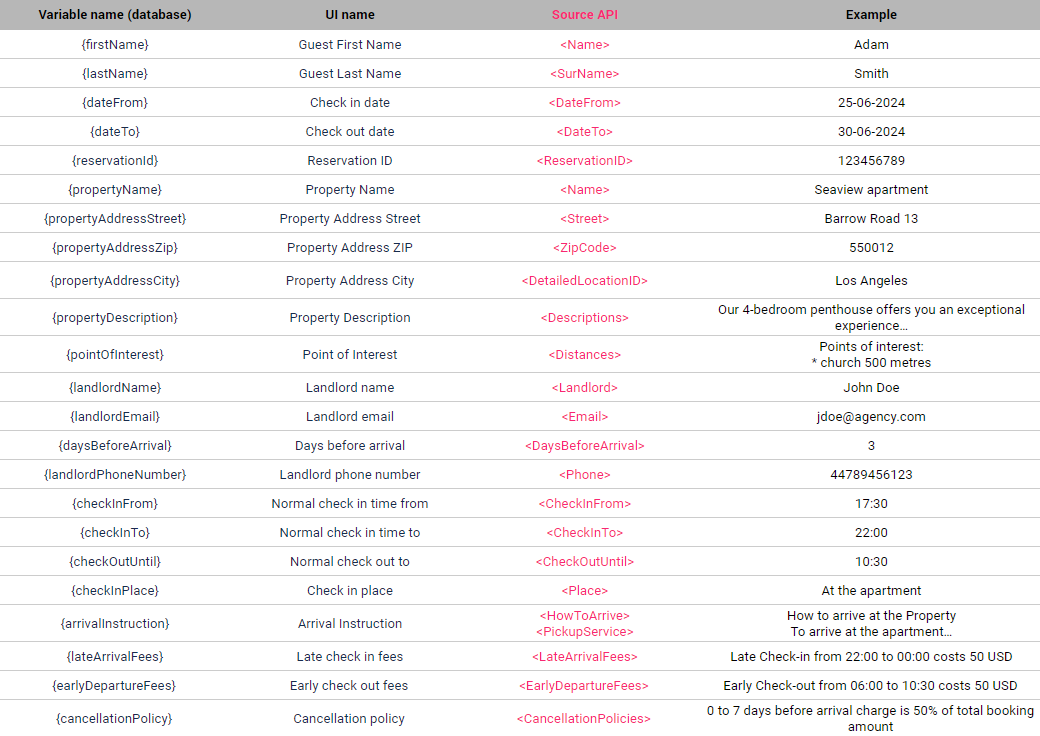
Variables are data placeholders which can be inserted into the templates. They represent certain booking, property or guest details and are dynamically converted into real data upon sending.
List of variables
Attachments
It is possible to add attachments to your message templates. However, bear in mind that different channels have different requirements regarding the attachments’ formats and sizes. Make sure that your attachments meet the requirements of all channels, so that your guests receive a complete message (message and attachment). You can check the size and format requirements here.
Before you start
Messaging automation is available as a standard Guest Communication feature. If you have already been using Guest Communication, there is no additional set-up required from you. You can immediately proceed to create your first automated messages: Create template and Set up rules.
If you have not used Guest Communication before, here is how to get started:
Configuration is not required for channels where there is an active Messaging API connection: Airbnb, Booking.com, Vrbo and Expedia. Messages to reservations coming from these channels will be delivered to the guest in the channel’s chat.
Configuration is required if you want to chat with guests who made bookings via other channels where there is no Messaging API connection. This configuration allows Rentals United to send emails on your behalf - as if you sent them from your mailbox. Step-by-step instructions on how to configure email forwarding are available here. Messages to reservations coming from these channels will be delivered to the guests via email to the email address provided in the reservation details.
Create template
In this step, you need to write the message that will be sent to your guests. You may want to keep your set-up simple, then the number of template messages will be lower and easier to manage.
However, if you want to create messages meant for different occasions (days before and after the arrival, properties, sales channels), you may need to create multiple template messages. It is optional and it is entirely up to your strategy whether you want to use multiple templates or not.
-
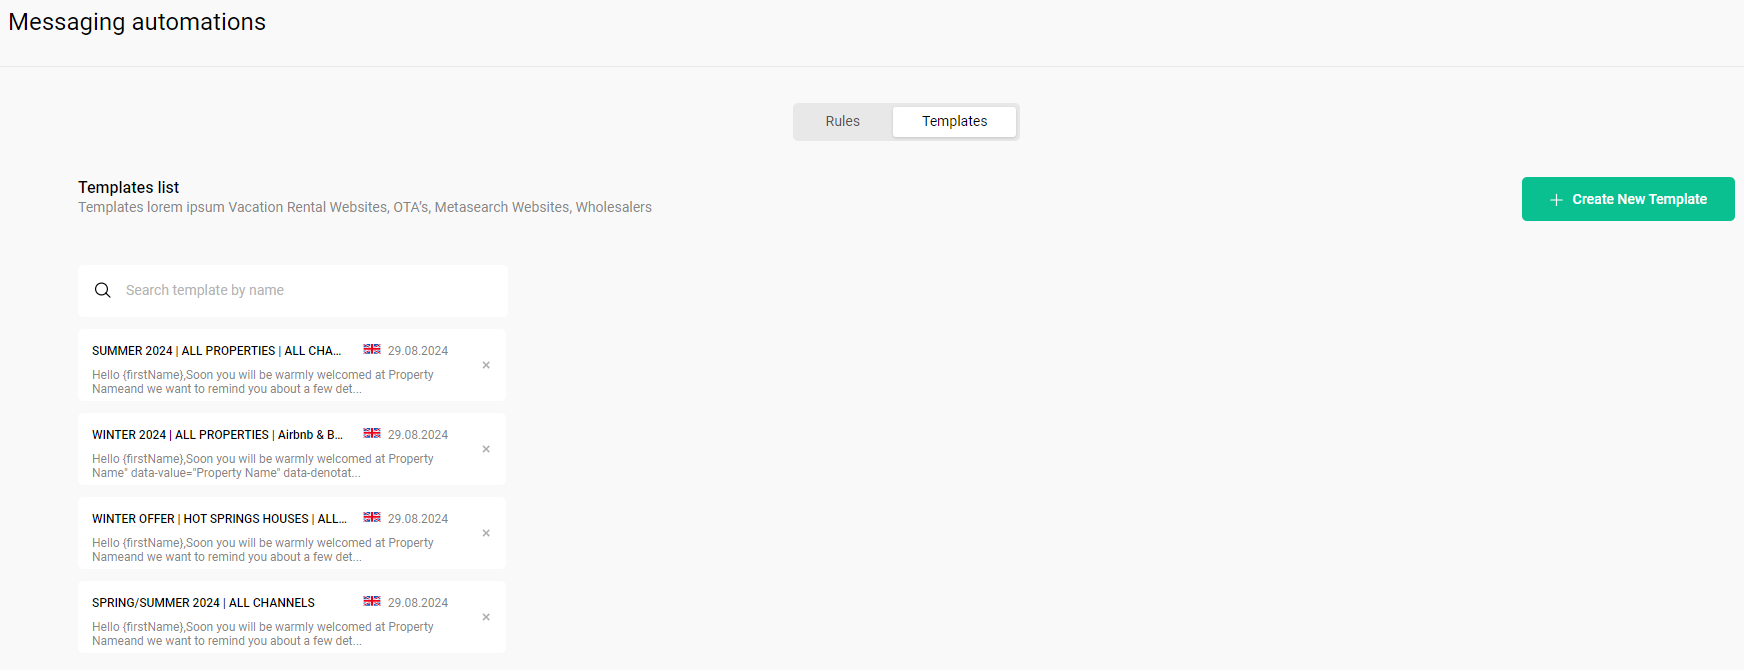
In the main menu, go to Automations and select Messaging.
-
Switch to the Templates tab.
-
Click Create new template.
-
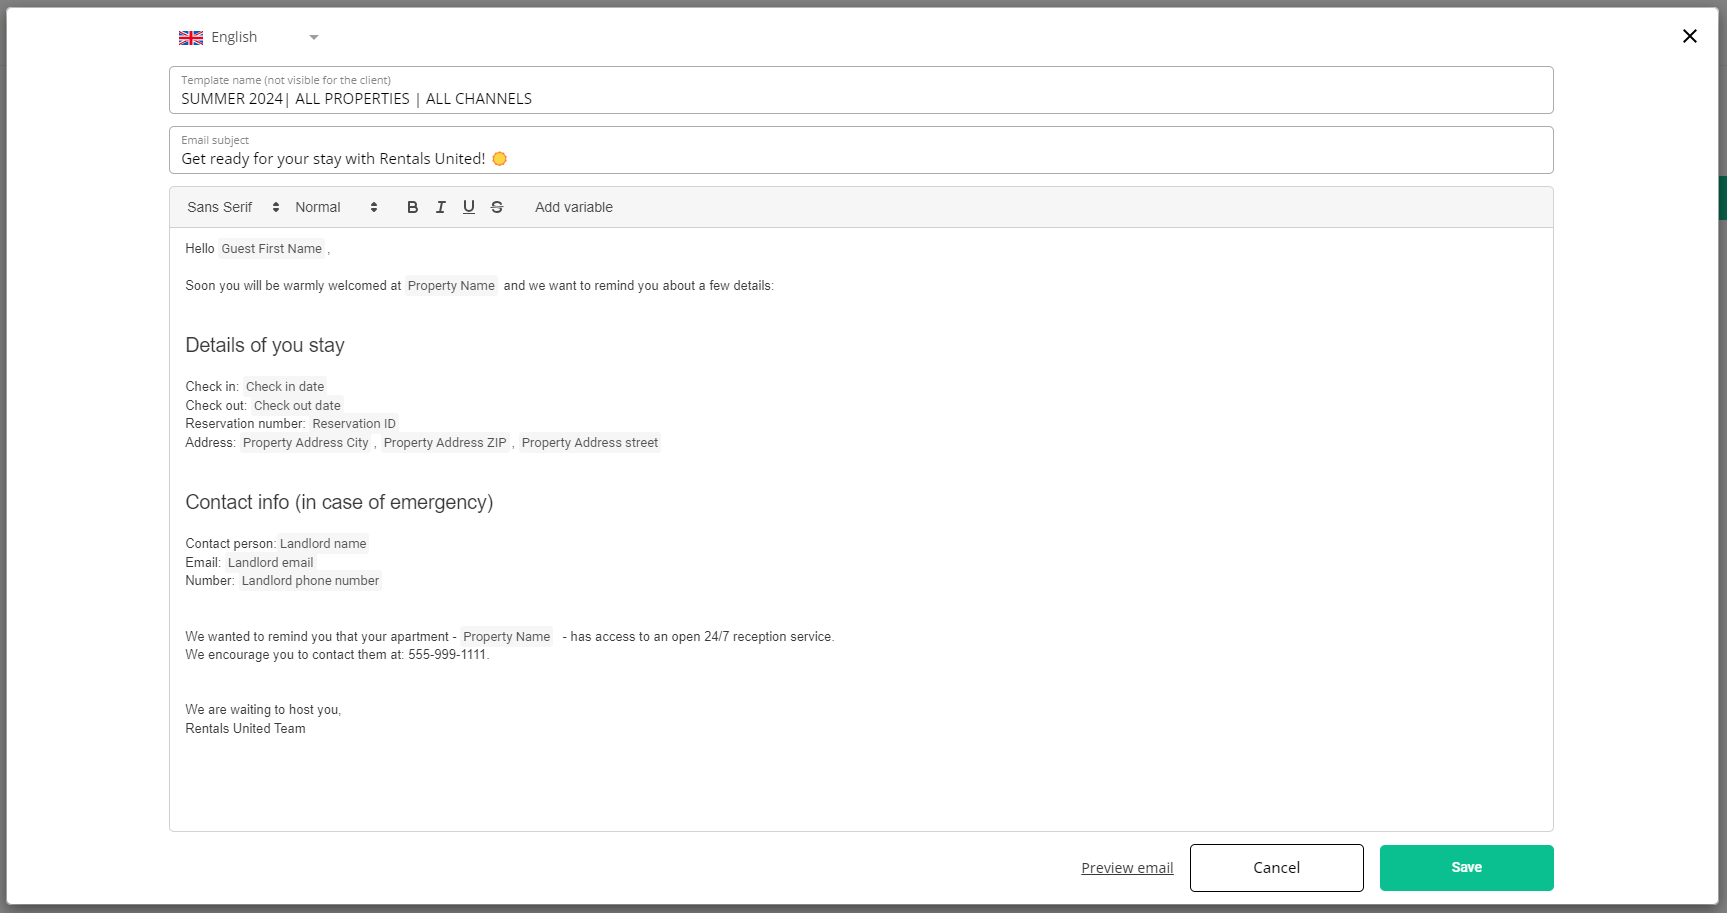
Provide the template details: template language, template name and email subject.
The template language and name are internal details only and will not be shared with the guests. These details will help you organise your templates in a better way.
The subject will display to the guest who will receive your messages via email, so make sure the subject is proper and contains no errors or internal information. The email subject will not display if the messages are sent via chat (e.g. Booking.com, Airbnb, Vrbo).
The maximum number of characters for the name and subject fields is 255 each.
-
Provide the template message content. Write the message and add variables where you want to use the dynamic data. Click Add variable and select the matching variable from the list. Read more about messages and variables here.
-
Click Preview email to make sure the message looks right.
-
Click Save.
Now when you have created the message, you need to set up the rules for sending it. Follow the next steps here.
You can also read more on how to edit the template and how to delete the template.
Set up rules
Once you have created your templates, now it is time to set up the rules on sending them. In this section, you will learn how to:
-
schedule when the message should be sent
-
include or exclude particular properties and sales channels
-
In the main menu, go to Automations and select Messaging.
-
Switch to the Rules tab.
-
Click Create new rule.
-
Provide the rule title, e.g. "Booking.com all properties (09/2024)". Descriptive titles let you organise your rules better and find them faster in case you need to update them.
In case you need longer descriptions of the created rules, you can provide additional information about the rule. To do that, click the Add note icon. The note will not be included in the message.
-
By default, automated messages will be sent to all reservations (on all properties and from all sales channels). However, you can define exactly which property names and sales channels should receive the message. In the IF section, click + Add more and select:
-
Property name to decide for which properties you will send the automated messages. Select only properties for which you want to send the automated messages. For more information on how to select properties, see here.
-
Sales channel to decide for which sales channels you will send the automated messages. You will see a list of all sales channels available in Services. Select only the ones for which you want to send the automated messages. If you want to send them to all channels, check Select all channels.
Offline / Book direct stands for offline bookings (e.g. reservations created manually in Guest Planner) or reservations booked via Book Direct.
My website stands for the My Website product and is available only if you have connected to it before via Services.
If you select all properties / all sales channels options, the messages will be scheduled also for properties you will create and sales channels you will connect to in the future.
-
-
Set up the sending time. In the THEN section, click + Add more and select:
-
When the reservation is made to sent out the message upon booking
-
Prior / post stay to sent out the message before and/or after arrival and/or departure
From the dropdown, choose the template message that you wish to send out. After you click the selected template, you will see the preview and will be able to verify its content.
In case of messages being sent prior / post stay, additionally provide the day when the message should be sent.
-
-
Click Save.
-
You are redirected to the Rules tab and the rule is set to Activate by default.
Now, your automated messages are scheduled and will be sent out according to the rules you have set. You can edit your rules, deactivate or delete them.
Rules examples
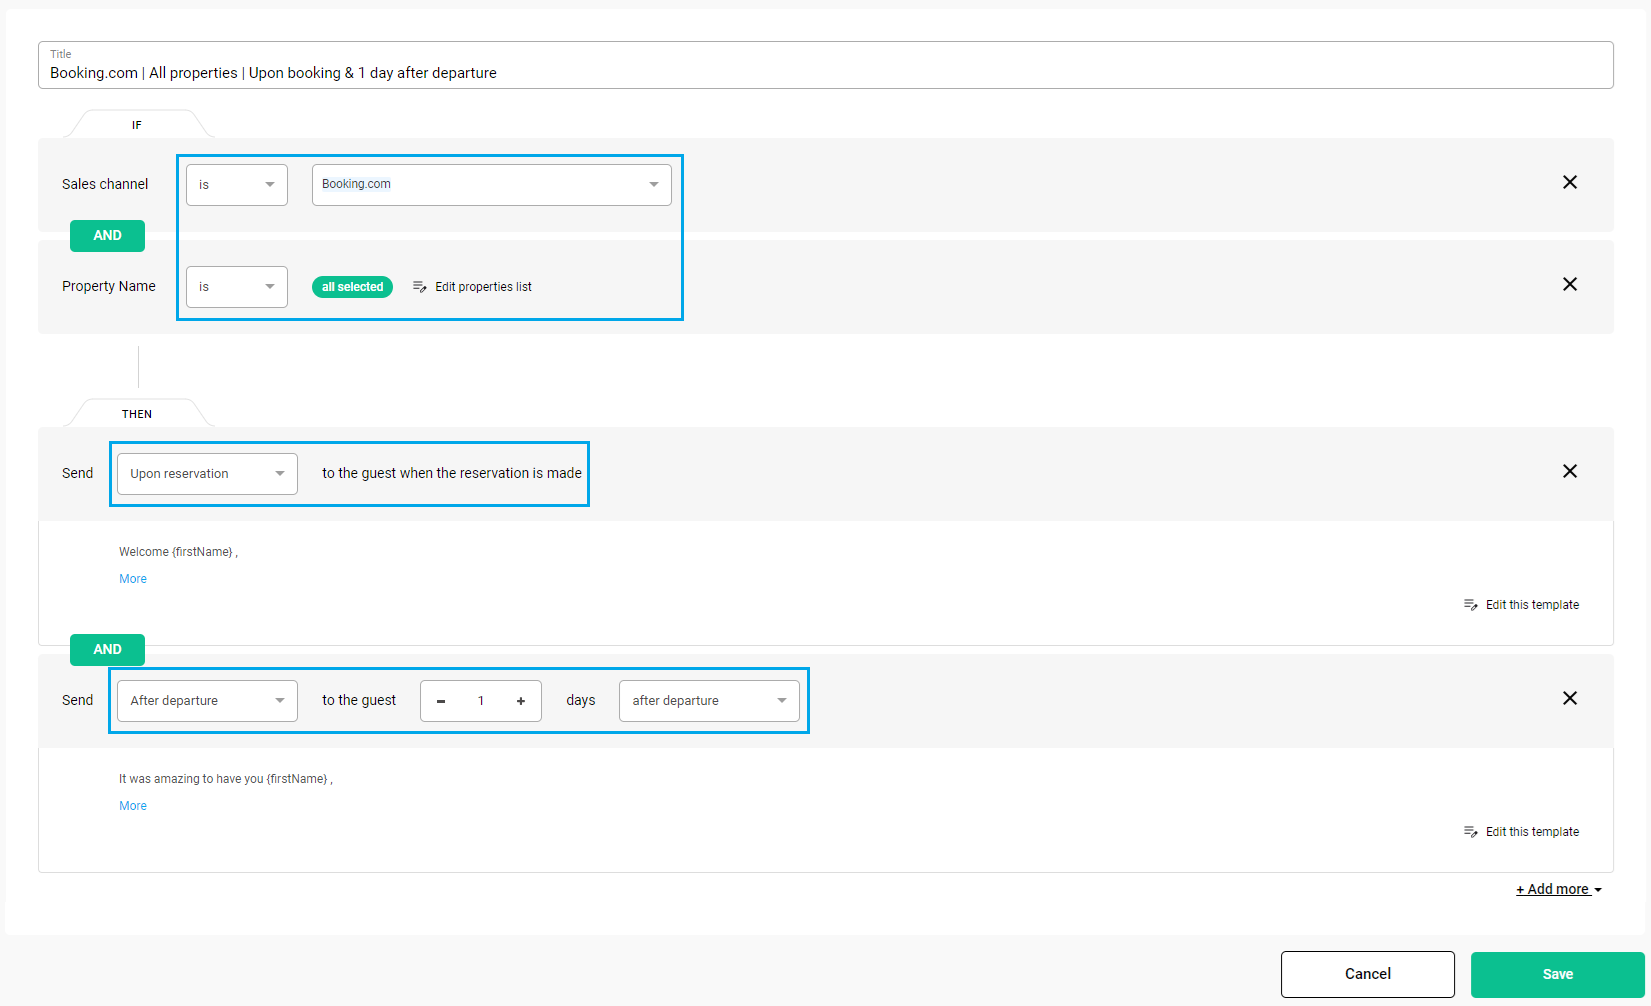
Example 1: I want to send messages:
-
for Booking.com only
-
for all my properties
-
upon booking
-
1 day after departure
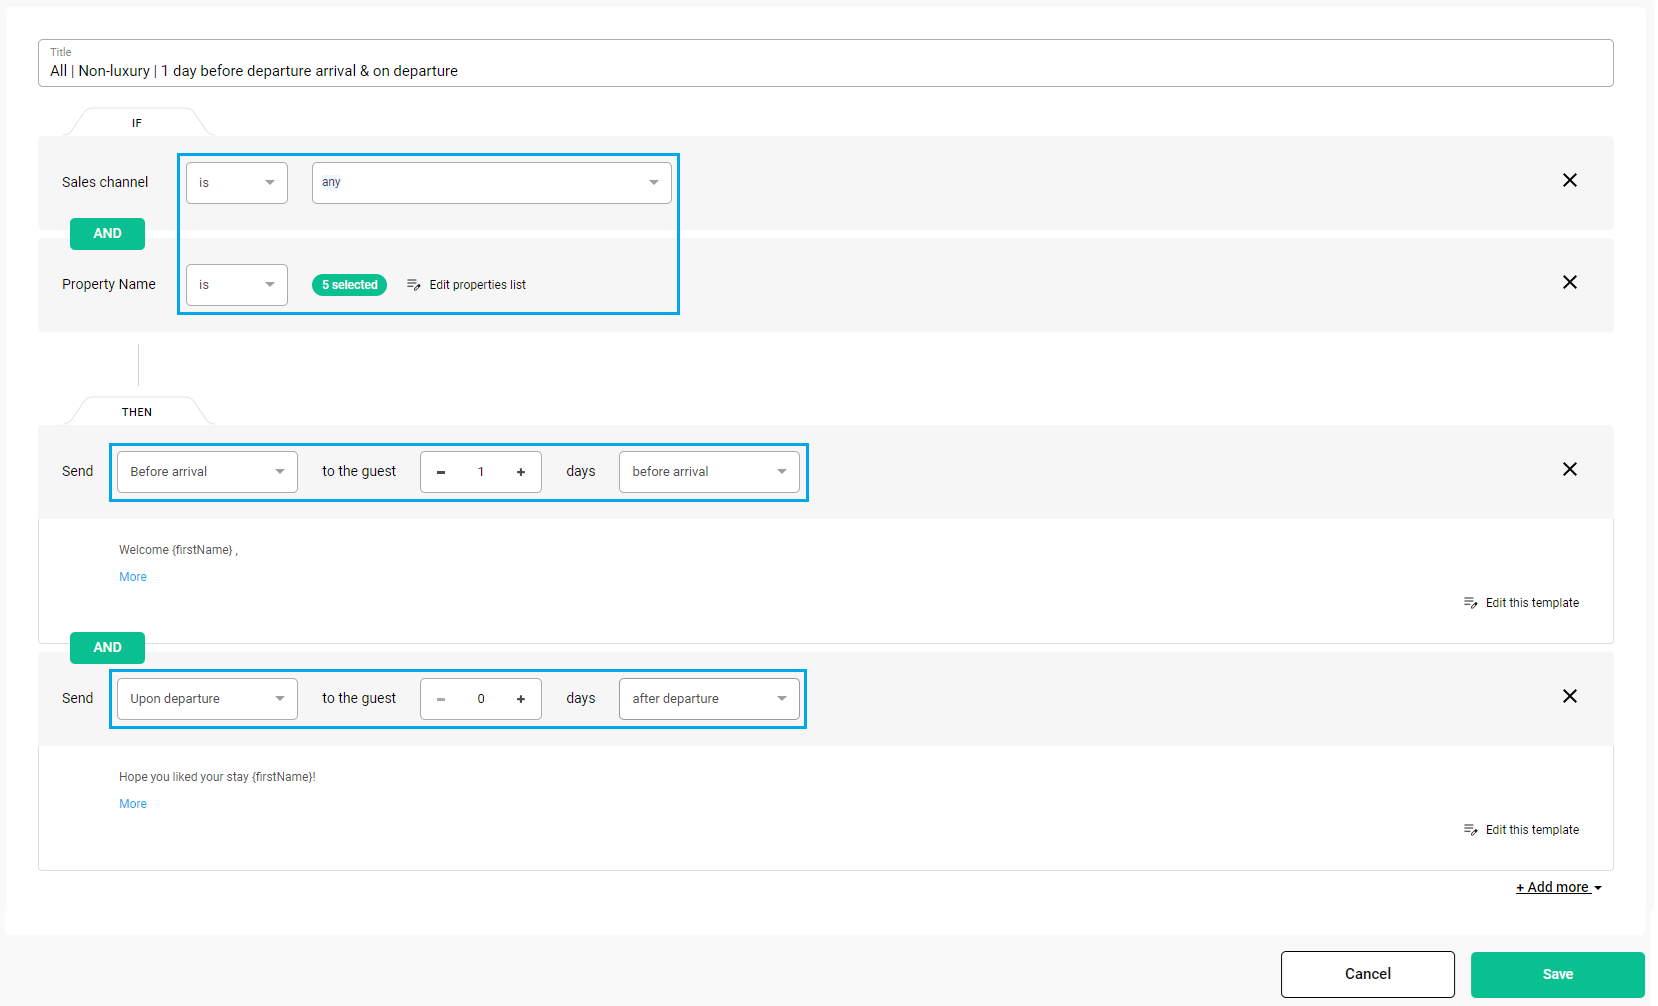
Example 2: I want to send messages:
-
for all sales channels
-
selected properties
-
1 day before arrival
-
on the day of departure
Other actions
Edit template
If you edit the template, you will update the message content for new and existing reservations. It means that messages that have been already scheduled, but not yet sent, will be updated too.
-
Go to Messaging automation.
-
Switch to the Templates tab.
-
Find the template in the list or use the searchbox.
-
Click the selected template.
-
Make edits.
-
Save.
Delete template
-
Go to Messaging automation.
-
Switch to the Templates tab.
-
Find the template in the list or use the searchbox.
-
Click the X button next to the template title.
If the template is currently in use, then you will be prompted to replace the template or remove the rules first.
After successful action, all scheduled messages are cancelled. The rule is removed from the collection.
Edit rules
If you edit the rule, the changes will apply only to newly scheduled messages (for new reservations).
-
Go to Messaging automation.
-
Switch to the Rules tab.
-
Find the rule in the list or use the searchbox.
-
Click the selected template.
-
Make edits.
-
Save.
Deactivate rules
-
Go to Messaging automation.
-
Switch to the Rules tab.
-
Find the rule in the list and switch the toggle to the Deactivated state.
The rule becomes inactive and all scheduled messages are suspended. It means that the messages that have been scheduled will not be sent while the rule is inactive. Also, when a new reservation comes in and the rule is inactive, no new messages are being scheduled, either.
You can activate the rule again any time. The messages that have been suspended and expired while the rule was inactive will not be sent. However, the messages that have been scheduled for the future will be sent out.
Delete rules
-
Go to Messaging automation.
-
Switch to the Rules tab.
-
Find the rule in the list or use the searchbox.
-
Click the X button next to the rule title.
-
Confirm.
The rule is deleted and all scheduled messages are cancelled. The rule is removed.
Important notes / Best practice
Messaging automation by default works for newly made reservations. If you wish to send out automated messages to reservations that already exist, please contact
***
Example: You have the following setting:
-
BOOKING DATE: 20 May
-
BOOKING TIME: 16:20 (timezone of the property)
-
STAY: 25 - 27 May
-
UPON BOOKING: Yes
-
BEFORE ARRIVAL: 5 days
-
BEFORE ARRIVAL: 1 day
-
AFTER DEPARTURE: 1 day
The message sent upon booking is sent out to the guest approximately at 16:20, 20th May.
The message sent 5 days before arrival is sent as soon as possible, approximately at 16:20, 20th May. This is because the automated message is validated against the number of days before the arrival and time is disregarded.
The message sent 1 day before arrival is sent at 12:00 PM on 24th May.
The message sent 1 day after departure is sent at 12:00 PM, on 28th May. The time referenced is the timezone of the property’s location.
***
If the booking is a multi-property booking (there are at least two different properties booked for the stay, which means there are at least two ResApaIDs assigned to this ReservationID), the time zone is always the same as multi-property reservations are allowed only for properties in the same location (city).
If the guest booked more than one property (more than one ResApaID), but on different dates, then the automated messaging rules will be validated against the property assigned to the earliest stay - both for arrival and departure.
Example: You have the following setting:
-
BOOKING DATE: 20 May
-
STAY I (ResApaID = 1): 25 - 27 May
-
STAY II (ResApaID = 2): 28 - 29 May
-
BEFORE ARRIVAL: 1 day
-
AFTER DEPARTURE: 1 day
The message sent 1 day before arrival is sent at 12:00 PM on 24th May and the message sent 1 day after departure is sent at 12:00 PM, on 28th May. No automated messages will be sent for the STAY II, so any messaging related to the STAY II should be sent out manually.
***
Automated messages are sent out only for the messages that are created in the Confirmed status. It means that no automated messages will be sent out for the bookings created in other statuses than Confirmed, in particular:
-
Lead
-
Request
-
Cancelled
Note that messages will also not be sent for reservations that were updated to the Confirmed status. For example, if you received a reservation in the Request status and you confirmed it, the messages will not be sent anyway.
***
Currently, automated messages are not supported for the modified bookings. It means that if the booking has some automated messages scheduled to be sent out and this booking is modified in the meantime, the scheduled messages will be sent out according to the original booking’s stay dates.
Example: You have the following setting:
-
BOOKING DATE: 20 May
-
ORIGINAL BOOKING: 25 - 27 May
-
MODIFIED BOOKING: 28 - 29 May
-
BEFORE ARRIVAL: 1 day
-
AFTER DEPARTURE: 1 day
The message sent 1 day before arrival is sent at 12:00 PM on 24th May and the message sent 1 day after departure is sent at 12:00 PM, on 28th May. Automated messages will be sent according to the original booking’s details.
***
If the booking is cancelled, all automated messages are cancelled automatically. No action is required.
***
Automated messages whose requirements are not met will not be sent out. It means that guests who book last-minute will not be spammed with expired automated messages.
Example: You have the following setting:
-
BOOKING DATE: 20 May
-
BOOKING: 25 - 27 May
-
BEFORE ARRIVAL: 10 days
-
BEFORE ARRIVAL: 7 days
-
BEFORE ARRIVAL: 3 days
-
BEFORE ARRIVAL: 0 days
-
AFTER DEPARTURE: day
The message sent 10 days before arrival is not sent .
The message sent 7 days before the arrival is not sent.
The message sent 3 days before arrival is sent at 12:00 PM on 22nd May.
The message sent 0 days before arrival (at the arrival day) is sent at 12:00 PM on 25th May.
***
There is no limit for the number of automated messages. However, it is recommended not to set up too many automated messages in order to avoid spamming your guests. This is particularly recommended in case your main focus is short and last-minute stays.
Example: You have the following setting:
-
BOOKING DATE: 24 May
-
BOOKING TIME: 16:20
-
BOOKING: 25 - 26 May
-
UPON BOOKING: Yes
-
BEFORE ARRIVAL: 1 day
-
BEFORE ARRIVAL: 0 days
-
AFTER ARRIVAL: 1 day
-
BEFORE DEPARTURE: 1 day
-
AFTER DEPARTURE 1 day
The message sent upon booking is sent approximately at 16:20 on 24th May.
The message sent 1 day before arrival is sent as soon as possible, approximately at 16:20 on 24th May.
The message sent 0 days before arrival is sent at 12:00 PM on 25th May.
The message sent 1 day after arrival is sent at 12:00 PM on 26th May.
The message sent 1 day before departure is sent at 12:00 PM on 25th May.
The message sent 1 day after departure is sent at 12:00 PM on 27th May.
The total number of messages within 4 days is 6. Note that messages are sent at the same time, which may negatively influence your guest relations
***
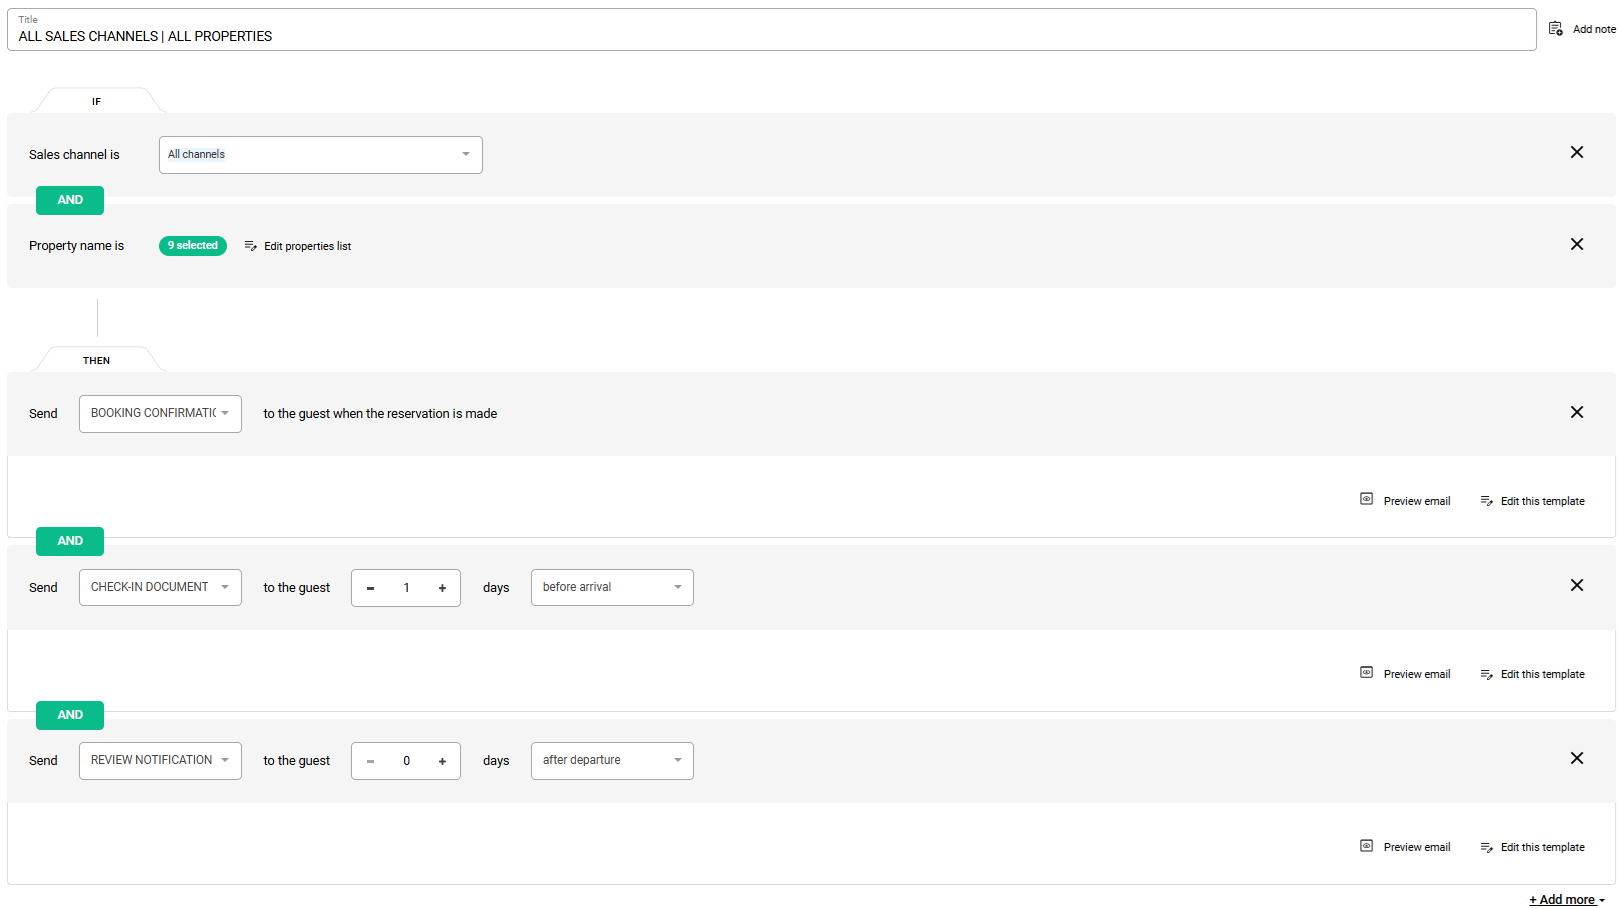
When setting up rules, it is essential to avoid creating multiple rules for the same conditions (sales channels and properties). Instead, combine all applicable conditions and templates into a single rule. This can be achieved by using the + Add more option within the rule set-up. Consolidating conditions within one rule helps you avoid duplicate messages and prevent conflicts.
Example: You have the following setting:
-
BOOKING CONFIRMATION RULE: All sales channels + All properties + Upon booking
-
CHECK-IN DOCUMENT: All sales channels + All properties + 1 day before arrival
-
REVIEW NOTIFICATION: All sales channels + All properties + 0 day after departure
Because all the above rules apply to all sales channels and all properties, all the rules are working.
Instead of creating multiple rules for the same conditions (sales channels and properties), create only one rule and select multiple messages to be sent upon different times.
Recommended set-up:
Not recommended set-up:
